Updated 27 Feb 2004
|
Planting a new oakwood in Dorset
|
|
How to plant oaks in a floodplain.
|
Our floodplain has fine clay beneath 6 inches of good topsoil, and needs a special technique. The plain is flat and covered with grass. We manage 6 trees per day in good weather, its hard work.but very satisfying.
|
Equipment needed.
|
- Three-year oak sapling inside a 10-litre pot.
- Sharp, strong spade, a "ditch spade" is best..
- 20 litres of loam (eg John Innes #3).
- Horse-and-timber frame (to remove rootball from pot).
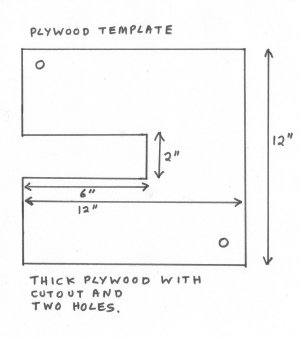
- Plywood template (to define hole size and hold rootball).
- Mulch mat (1 meter square) and 9 pegs.
- Hammer and two 6 inch nails.
- White paint and paintbrush.
- Watering can.
- Gardening gloves.
|
|
1. Plywood template.
 |
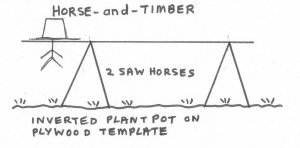
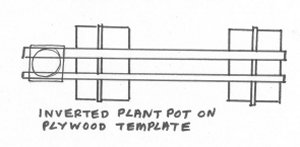
2. Horse-and-timber frame.
 |
3. Sapling planted.
 |
|
Planting out.
|
- Mark the field out with 8 foot bamboos, pushed into the soil on a 10 metre separation. Bamboos are necessary to locate the saplings when the grass has grown high. Regular layout is necessary when grass-cutting or driving round the field to inspect. 10 metres needed to allow oaks to grow to a mature size without crowding.
- Place a plywood template (see diagram 1) next to the bamboo and peg to the soil with two six-inch nails, and temporarily remove the bamboo.
- Push a sharp and strong spade (eg a "ditch spade") around the template to the depth of the spade. (Removing the spade is the physically hardest part of the whole operation because of the clay. Rock the spade back and forth until the suction breaks, then its much easier.)
- Remove nails and template, then remove grass sod in one piece and place next to the hole with grass side down. (Removing the grass and attached earth in one piece is very hard work, but has advantages in dealing with it afterwards.)
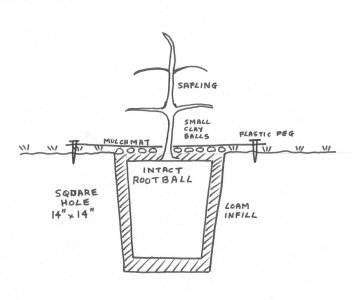
- Place a kneeler next to the hole, and with a trowel or spade, dig further down to a couple of inches deeper than the pot.
- Place two inches of John Innes Number 3 or similar loam into the bottom of the hole.
- Place the plywood template on top of the pot holding the tree (see diagram 1).
- Invert pot and template, holding the template with one hand to prevent rootball falling out of the pot.
- Place the upside-down pot and template onto the horse-and-timber frame (see diagram 2).
- Remove the pot, leaving the pot-shaped rootball and earth intact.
- Inspect the rootball, and tease some of the roots out of the ball if it is partly "pot-bound".
- Lift the rootball and template out of the horse-and-timber frame, and rotate so that the tree points upwards as God intended.
- Place the rootball into the hole on top of the 2 inches of loam.
- Topfill and sidefill with loam, then place small bits of clay on top (see diagram 3).
- Water thoroughly from watering can.
- Place mulch mat around sapling.
- Hammer 9 plastic pegs to pin mulch mat to ground, taking care to avoid hitting finger with hammer.
- Paint tree ID number on mulch mat with white paint and brush, best done in dry weather.
- Push bamboo into ground next to mulch mat (second hardest operation).
- Move on to next sapling position.
|
|
Compiled, formatted, hyperlinked, encoded,
and copyright © 2004,
John Palmer, All Rights Reserved.
|